Adding General Ledger Numbers
General ledger numbers added at any level must populate ordinate organizational entities – balance sheet accounts to book level and income or expense accounts to all levels. The ordinate organizational entity roll up would not balance if this does not occur. As an example, if adding a general ledger number at territory, the number should automatically populate the organization level for both balance sheet and income and expense accounts. The new account number would also populate the ordinate region if it is an income and expense account.
Quickly navigate to procedures included in this topic by clicking one of the links below:
To Add a General Ledger Number
To Edit a General Ledger Number
To Add a General Ledger Number
- On the Primary menu, click ORGANIZATION.
- Click the accounting > general ledger tab. The chart of accounts tab is displayed with a summary of general ledger numbers.
Note: If it is necessary to add a general ledger account at any other level, click ORGANIZATION > the correct level tab > Details  icon accounting > general ledger > chart of accounts tab.
- On the chart of accounts tab, click [Add New]. The Add New General Ledger Number dialog box is displayed.
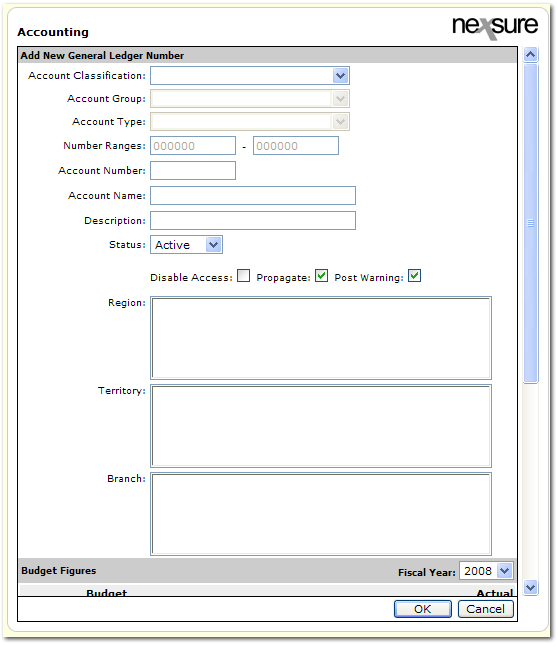
- In the Account Classification list, select the classification under which the new number will belong. The Account Group list becomes active. Selections in this list will filter the selections available in the Account Group list.
- In the Account Group list, select the group under which the new number will belong. The Account Type list becomes active. Selections in this list will filter the selections available in the Account Type list.
- In the Account Type list, select the type of account for the new number. Once an Account Type is selected, the Number Range boxes are populated with the range of acceptable general ledger numbers for the selected type.
- In the Account Number box, enter the new six digit number for the general ledger account. As soon as the number is entered, a search is performed to see if the account already exists. A notation next to the Account Number box will indicate if the account exists or not.
- In the Account Name box, enter the name of the new account.
- In the Description box, enter an optional description of the new account. This description will only be displayed when editing the general ledger account.
- In the Status list, select Active or Inactive to indicate the status of the account. The account cannot be set to inactive for mandatory general ledger numbers or accounts with balances.
- Select the Disable Access check box to disable direct posting to the general ledger account. Individuals may be given the rights to override this setting in their security setup under Resource Groups > General Ledger > Chart of Accounts > Allow Override.
- Select the Propagate check box to add the new general ledger account to all levels under the level where the new account was set up when a new level is added. This option is selected by default. If not selected, the new general ledger number will not be added when a new entity level is added.
- Select the Post Warning check box to enable a warning message that says the account is restricted. On the warning dialog box, OK can be selected to ignore the warning or Cancel can be selected to make another account selection.
- In the Region list, select the Region in which the new general ledger number will be used. If the general ledger number is being added at the region level, the region will already be set. Press and hold the CTRL key to select multiples.
- In the Territory list, all territories under the selected region are displayed. The list of available selections contains only those territories that are subordinate to the selected region. If the new general ledger number is being added at the territory level, the territory selection will already be set. Press and hold the CTRL key to select multiples.
Note: A territory does not have to be selected, the new general ledger number can remain at the region level and up.
- In the Branch list, all branches under the selected territory are displayed. The list of available selections contains only those branches that are subordinate to the selected territory. If the new general ledger number is being added at the branch level, the branch selection will already be set. Press and hold the CTRL key to select multiples.
Note: A branch does not have to be selected, the new general ledger number can remain at the territory level and up.
- In the Budget Figures area, first select the year for the budget then enter the budgeted amount for each period in the numbered spaces provided. The numbers next to each Budget box correspond to each accounting period.
- Click OK to save the new general ledger number. A confirmation dialog box will be displayed. Click OK again.
Or
Click Cancel to abort the addition of the new general ledger number and return to the chart of accounts tab.
To Edit a General Ledger Number
The following instructions show how to edit an existing general ledger number. The access to edit the general ledger number is through the steps to add a general ledger number. When in the Add New General Ledger Number dialog box the general ledger number to be edited is looked up. Then the options for the number can be edited.
- On the Primary menu, click ORGANIZATION.
- Click the accounting > general ledger tab. The chart of accounts tab is displayed with a summary of general ledger numbers.
Note: If it is necessary to edit a general ledger account at any other level, click the correct level tab > Details icon and then use the navigation path above to navigate to the chart of accounts tab for that level.
- On the chart of accounts tab, click [Add New]. The Add New General Ledger Number dialog box is displayed. Make the following selections that match the account that needs to be edited.
- In the Account Classification list, select the classification under which the current number belongs. The Account Group list becomes active. Selections in this list will filter the selections available in the Account Group list.
- In the Account Group list, select the group under which the current number belongs. The Account Type list becomes active. Selections in this list will filter the selections available in the Account Type list.
- In the Account Type list, select the type of account for the current number. Once an Account Type is selected, the Number Range boxes are populated with the range of acceptable general ledger numbers for the selected type.
- In the Account Number box, enter the current six digit number for the general ledger account to be edited. As soon as the number is entered, a search is performed to find the account. A notation next to the Account Number box will indicate if the account exists or not.
Once the account number is entered, the resulting details for that account are displayed. Use the instructions above for adding a new general ledger number to help alter selections as necessary.
- Click OK to save the edits to the general ledger number. A confirmation dialog box will be displayed. Click OK again.
Or
Click Cancel to abort the editing process and return to the chart of accounts tab.
Mandatory General Ledger Numbers
Locking General Ledger Numbers
Chart of Accounts